April 1st - April 10th 2012
I made 3 dolls from wool in 10 days.
One of the doll is for winner from my facebook page: Katkas creations
LEGS:
With my first dolls, I used - chain 2, into first chain 6 dc
Now I use only magic ring (see photos)
R 1 - 6 dc into magic ring.
After I finished R1, I used short piece of wool at the beginning of every round - as marker, easy to keep count of rounds
LEG (make 2)
R1 - (6sts) = 6 dc in magic ring (OR chain 2, 6dc in second chain from hook)
R2 - (6sts) dc
around
R3 - (6sts) dc
around
R4 - (7sts) = dc 2 in first st, dc 5
R5 - (7sts) dc
around
R6 - (7sts) dc
around
R7 - (8sts) dc 2 in first st, dc 6
R8 - (8sts) dc
around
R9 - (8sts) dc
around
R10 - (9sts) dc 2 in first st, dc 7
R11 - (9sts) dc
around
R12 - (9sts) dc
around
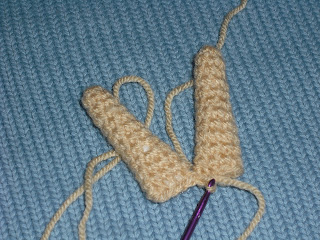
* crochet 1st leg –
stuff the leg - fasten off (cut yarn), leave a short end
* crochet 2nd leg –
stuff the leg - when leg is finished, do not fasten off (do not cut yarn),
continue with BODY
BEGINNING OF
BODY:
* flatten the last round
of the second leg - crochet 4 slip stitches to close leg opening,
flatten the last round
of the first leg – crochet another 4 slip stitches to close leg
opening.
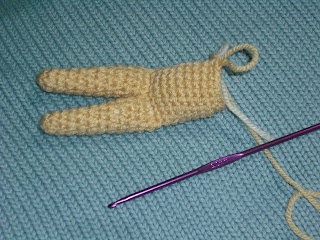
The legs are together
NOW in 1 row, 4sts for each leg, total of 8 stitches in the last row
to create the bottom of the body
* legs can bend, so doll
can sits
* legs are not stitched
separately to the body
BODY
R1 - dc
in a back loop of each st – (8 dc on back body) /// turn
the body and ///
dc
in a front loop of each st - (8 dc on front body), total of 16sts,
do
not join, again work in rounds – use a row marker
R2 - (16sts) dc around
R3 - (16sts) dc
around
R4 - (16sts) dc
around
R5 - (16sts) dc around
R6 - (16sts) dc around
R7 - (16sts) dc around
R8 - (16sts) dc around
R9 - (14sts) (dec 1, dc 6) repeat 2 times
R10 - (10sts) (dec 1, dc 2, dec 1, dc 1) repeat 2 times
R11 - (8sts) (dec 1, dc 3) repeat 2 times
R12 - when using wool BIGGER DOLL - (8sts) dc around
After I made legs & body. I made arms & heads.
I wanted to save body colour, so I used white wool on R 2 - R 10
Smiles are ready, just hair to make.
Already made ;-) see photos on my facebook.
MY LAST, 2nd BLOG POST (this is only 3rd) - there is written pattern for my doll - I checked the pattern & there is just one change, BODY :
old numbers R 2 to R 13 changed to new numbers R 1 to R 12
SO IT'S EASIER TO COUNT !!!
YOU CAN FIND THIS DOLL PATTERN AGAIN DOWN HERE:
** If you wish to
share this pattern, you may link to this pattern, but please do not
reprint it on your site.**
FREE PATTERN of CROCHET DOLL
* Work in continuous
rounds, do not join the rounds.
* Use a row marker OR
mark your first stitch with short piece of wool at the beginning of
every round, easy to keep count of rounds.
. - ch - chain
I - dc - double
crochet = US sc single crochet
V - inc - increase
A - dec - invisible
decrease
st(s) - stitch(es)
R - round
o - magic ring /
or / chain 2, 6dc in second chain from hook
SMALL DOLL – used
crochet thin yarn
BIGGER DOLL – used
wool
HEAD
R1 - (6sts) = 6 dc in magic ring (OR chain 2, 6 dc in second chain from hook)
R2 - (12sts) = dc 2
in each st around
R3 - (18sts) = (dc 1, 2 dc in next st) repeat 6 times
R4 - (24sts) = (dc 2, 2 dc in next st) repeat 6 times
R5 - (30sts) = (dc 3, 2 dc in next st) repeat 6 times
R6 – R13 = dc
around (30sts)
R14 - (24sts) = (dc 3, dec 1) repeat 6 times
R15 - (18sts) = (dc 2, dec 1) repeat 6 times
R16 - (12sts) = (dc 1, dec 1) repeat 6 times
R17 - (6sts) = (dec
1) repeat 6 times
when you finish R15:
* Attached safety eyes
between rounds 11 and 12 (6 sts free between eyes)
* Embroider smile with
embroidery floss (on round 14)
* Begin stuff &
shape head
when you finish R17:
* fasten off, leave
a short end, weave in end.
head of BIGGER DOLL
from wool:
R17 - (8sts) = (dc 1, dec 1) repeat 4 times
R18 - (8sts) = dc around
ARMS (make 2)
R1 - (6sts) = 6 dc in magic ring (OR chain 2, 6dc in second chain from hook)
R2 –
R10 = (6sts) = dc around
* fasten off, leave a
long ends for sewing arms to body
LEGS (make 2)
R1 - (6sts) = 6 dc in magic ring (OR chain 2, 6dc in second chain from hook)
R2 - (6sts) dc
around
R3 - (6sts) dc
around
R4 - (7sts) = dc 2 in first st, dc 5
R5 - (7sts) dc
around
R6 - (7sts) dc
around
R7 - (8sts) dc 2 in first st, dc 6
R8 - (8sts) dc
around
R9 - (8sts) dc
around
R10 - (9sts) dc 2 in first st, dc 7
R11 - (9sts) dc
around
R12 - (9sts) dc
around
* crochet 1st leg –
stuff the leg - fasten off, leave a short end
* crochet 2nd leg –
stuff the leg - when leg is finished, do not fasten off (cut yarn),
continue with BODY
BEGGINING OF
BODY :
* flatten the last round
of the second leg - crochet 4 slip stitches to close leg opening,
flatten the last round
of the first leg – crochet another 4 slip stitches to close leg
opening.
The legs are together
NOW in 1 row, 4sts for each leg, total of 8 stitches in the last row
to create the bottom of the body
* legs can bend, so doll
can sits
* legs are not stitched
separately to the body
BODY
R1 - dc
in a back loop of each st – (8 dc on back body) /// turn
the body and ///
dc
in a front loop of each st - (8 dc on front body), total of 16sts,
do
not join, again work in rounds – use a row marker
R2 - (16sts) dc around
R3 - (16sts) dc
around
R4 - (16sts) dc
around
R5 - (16sts) dc around
R6 - (16sts) dc around
R7 - (16sts) dc around
R8 - (16sts) dc around
R9 - (14sts) (dec 1, dc 6) repeat 2 times
R10 - (10sts) (dec 1, dc 2, dec 1, dc 1) repeat 2 times
R11 - (8sts) (dec 1, dc 3) repeat 2 times
R12 - when using wool BIGGER DOLL - (8sts) dc around
* Fasten
off, leave a long tail for sewing body to head.


Really lovely creations. Thanks for sharing your patterns.
ReplyDeleteSweet Faery Creations
Thank you for sharing💙
ReplyDelete