Saturday 21 September 2013

BUNNY, small, yellow
by Katka Sanderson from Katka's Creations


** You may keep a copy for your own personal use, but you may not sell or distribute it. **

** You can sell items made from this pattern, please provide a link to this pattern.**

** Please, do not claim this pattern as your own. This pattern is FREE for everyone !!! **

** If you wish to share this pattern, you may share link to this pattern, but please do not reprint it on your site.**

  • Work in continuous rounds, do not join the rounds.
  • Use a row marker OR mark your first stitch with short piece of wool at the beginning of every round, easy to keep count of rounds.
sc - single crochet US term  = / UK term - dc – double crochet /
ch - chain
inc - increase = 2 sc in one stitch
dec - I use invisible decrease / sc 2 tog (tog = together)
st(s) - stitch(es)
r. - round
magic ring / OR / chain 2, 6sc or 7sc in second chain from hook
rep - repeat
7x – 7 times
sl st – slip stitch


BUNNY – HEAD (yellow colour)

r.1 = 7sc into magic ring = (7sts)
r.2 = 2sc in each st around = (14sts)
r.3 = (* sc in 1 st, 2 sc in next st *) - rep 7x = (21 sts)
r.4 = (* sc in 2 sts, 2 sc in next st *) - rep 7x = (28 sts)
r.5 = (* sc in 3 sts, 2 sc in next st *) - rep 7x = (35 sts)
r.6 = (* sc in 4 sts, 2 sc in next st *) - rep 7x = (42 sts)
r.7 = (* sc in 5 sts, 2 sc in next st *) - rep 7x = (49 sts)
r.8 - 13 = sc in each st around = (49 sts)
r.14 = (* sc in 5 sts, sc 2tog *) - rep 7x = (42sts)
r.15 = (* sc in 4 sts, sc 2tog *) - rep 7x = (35 sts)
r.16 = (* sc in 3 sts, sc 2tog *) - rep 7x = (28 sts)
Attach safety EYES between r.13 & r.14 /
or / stitch on beads after you make the head.
Start to stuff the head
r.17 = (* sc in 2 sts, sc 2tog *) - rep 7x = (21 sts)
r.18 = (* sc in 1 st, sc 2tog *) - rep 7x = (14 sts)
r.19 = (* skip 1 st, sc 1 *) - rep 7x = (7 sts) when using thread OR
OR r.19 = when using wool - (* sc 2tog *) - rep 7x = (7sts) sl st
stuff firmly
cut free and weave short tail in.


BUNNY – BODY (yellow colour)

r.1 = 6sc into magic ring = (6 sts)
r.2 = 2sc in each st around = (12 sts)
r.3 = (* sc in 1 st, 2 sc in next st *) - rep 6x = (18 sts)
r.4 = (* sc in 2 sts, 2 sc in next st *) - rep 6x = (24 sts)
r.5 - r.7 – sc in each st around = (24 sts)
r.8 = (* sc in 2 sts, sc 2tog *) - rep 6x = (18 sts)
r.9 - r.13 – sc in each st around = (18 sts)
r.14 = (* sc in 7 sts, sc 2tog *) - rep 2x = (16 sts)
r.15 = sc in each st around = (16sts) sl st
stuff body
cut free and leave long tail for sewing.


BUNNY – ARM (yellow colour) 2x

r.1 = 6sc into magic ring = (6 sts)
r.2 = 2sc in each st around = (12 sts)
r.3 - r.4 – sc in each st around = (12 sts)
r.5 = (* sc 2tog *) - rep 6x = (6 sts)
stuff hand only
r.6 - r.12 – sc in each st around = (6 sts)
flatten hand and close open end together with 3 sc.
cut free and leave long tail for sewing.


BUNNY – LEG (yellow colour) 2x

r.1 = 6 ch, into 2nd ch from hook make 1 sc, sc in 3 sts, 3sc in next st;
(now work on opposite side of chains) – sc in 3 sts, 2 sc in last 2 sts = (14 sts)
r.2 = 2sc in first st, sc in 4 sts, 3sc in next st, sc in 7 sts, 2 sc in last st = (18 sts)
r.3 – r.4 = sc in each st around = (18 sts)
r.5 = sc in 5 sts, sc 2 tog – 3x, sc in 5 sts, sc 2 tog = (14 sts)
r.6 = sc in 3 sts, sc 2 tog, sc 3 tog, sc 2 tog, sc in 4 sts = (10 sts)
r.7 = sc in each st around = (10 sts)
stuff foot firmly
r.8 = sc in 4 sts, sc 2 tog, sc in 4 sts = (9 sts)
r.9 – r.10 = sc in each st around = (9 sts)
r.11 = sc in 4 sts, sc 2 tog, sc in 3 sts = (8 sts)
r.12 – r.13 = sc in each st around = (8 sts)
r.14 = sc 2 tog, sc, sc 2 tog, sc, sc 2 tog = (5 sts)
r.15 = sc 2 tog, end
stuff leg very little
flatten leg and close open end together
cut free and leave long tail for sewing.


BUNNY – EARS (yellow colour) 2x

r.1 = 5sc into magic ring = (5 sts)
r.2 = 2sc in each st around = (10 sts)
r.3 = (* sc in 1 st, 2 sc in next st *) - rep 5x = (15 sts)
r.4 - r.7 – sc in each st around = (15 sts)
r.8 = (* sc in 3 sts, sc 2tog *) - rep 3x = (12 sts)
r.9 - r.10 – sc in each st around = (12 sts)
r.11 = (* sc in 2 sts, sc 2tog *) - rep 3x = (9 sts)
r.12 – r.14 = sc in each st around = (9sts)
do not stuff
flatten ears and close open end together with 4 sc
cut free and leave long tail for sewing.

Stitch parts together.

Now, you have finished yellow bunny – without clothes.
If there are any questions, please leave a comment below or leave a message on my facebook wall - Katkas creations...
PLEASE, let me know how do you understand this pattern, if it was easy enough to fallow...
PLEASE, could you share your photo of bunny on my facebook wall - Katkas Creations...

Check next blog - few days time there will be pattern for red dress & blue trousers
Happy crocheting,   Katka


Monday 22 April 2013

ELEPHANT FREE PATTERN by Katka Sanderson from Katkas Creations

I made these elephants for my mum and my son as Valentine gift, 14th February 2013


ORIGINAL PATTERN from :


I love this pattern, especially the HEAD of the elephant with the trunk, but I wanted my elephant to sit down, with all 4 legs. So I changed pattern.....

FREE for everyone.
Please, do no SHARE, do not POST anywhere !!!
If you want to SHARE – share link to both patterns – ORIGINAL & MINE ;-)
ONLY for personal use.


ch = chain
st = stitch
sc = single crochet
sc 2 tog = 2 stitches sc ogether

Instead of magic ring = 2 chain, 7 sc in 2nd chain from the hook = 7sc into magic ring

from original pattern make:
HEAD with TRUNK (SNOUT), EARS make 2, BODY


ELEPHANT – FRONT LEGS – make 2

r.1 = 7 sc into magic ring = (7sts)
r.2 = 2sc in each stitch around = (14sts)
r.3 = (* sc in one stitch, 2 sc in the next stitch *) - repeat 6times = (21sts)
r.4 = sc in each stitch around, ONLY BACK LOOPS = (21sts)
r.5 = sc in each stitch around = (21sts)
r.6 = (* sc in next 3 stitches, sc 2 tog *) - repeat 4 times, sc in last stitch (17sts)
r.7 – r.8 = slip stitch in first 5 stitches, sc in next 4 stitches, half double crochet in next 4 stitches, sc in last 4 stitches = (17sts)
r.9 = slip stitch in first 5 stitches, sc in next 12 sts = (17sts)
r.10 – r.14 = sc in each stitch around = (17sts)
r.15 = sc in first 4 stitches, sc 2 tog, sc in next 3 stitches, sc 2 tog, sc in next 4 stitches, sc 2 tog = (14sts)
r.16 = sc in each stitch around = (14sts)
r.17 = sc 2 tog, sc in next 2 stitches, sc 2 tog, sc in last 8 stitches = (12sts)
r.18 – r.19 = sc in each stitch around = (12sts)
r.20 = (* sc 2tog *) - 6 times = (6sts)
r.21= sc 2 tog – END, cut free and leave long rail for sewing.


ELEPHANT – BACK LEGS – make 2

r.1 = 6sc into magic ring = (6sts)
r.2 = 2sc in each stitch around = (12sts)
r.3 = (* sc in one stitch, 2 sc in the next stitch *) - repeat 6times = (18sts)
r.4 = (* sc in two stitches, 2 sc in the next stitch *) - repeat 6times = (24sts)
r.5 = sc in each stitch around, ONLY BACK LOOPS = (24sts)
r.6 = sc in first 6 stitches, sc 2tog - FIVE times, sc in next 6 stitches, sc 2tog = (18sts)
r.7 - r.10 = sc in each stitch around = (18sts)
r.11 = sc in first 3 stitches, sc 2tog, (* sc in next 2 stitches, sc 2tog *) - 2 times; sc in next 3 stitches, sc 2tog = (14sts)
r.12 - r.17 – sc in each stitch around = (14sts)
r.18 = (* sc in next 5 stitches, sc 2tog *) - 2 times = (12sts)
r.19 = sc in each stitch around = (12sts)
r.20 = (* sc 2tog *) - 6 times = (6sts)
r.21
= sc 2 tog – END, cut free and leave long rail for sewing.

Make little tail – see ORIGINAL PATTERN


Enjoy !!
Happy crocheting, Katka

Please, contact me if you find any mistake or if you have any question ;-)

Wednesday 4 July 2012

Doll pattern in Slovak - Babika, postup v slovenctine

Doll pattern in English - postup v anglictine :
http://katkascreations.blogspot.co.uk/2012/02/you-may-keep-acopy-for-your-own.html


** Mozete si nechat kopiu postupu pre svoje osobne potreby, ale nemozete ho predat alebo distribuovat !!! **

** Mozete predavat vyrobky, ktore ste vyrobili z tohto postupu, prosim Vas ale, pripojte k vyrobku  poznamku: ''postup podla Facebook stranky: Katkas creations''.**

** Prosim Vas, neprivlastnujte si tento postup ako za Vas. Tento postup je a vzdy bude ZDARMO pre kazdeho !!! **

** Ak by ste sa chceli s niekym podelit o moj postup, mozte, ale len jednym sposobom, a to: SHARE the LINK k postupu. Nekopirujte a nezverejnujte tento postup na Vasej stranke.**


ZADARMO POSTUP  - HACKOVANA BABIKA

* Hackujeme dookola, riadky neuzatvarame.
* Pouzite kusok vlny na zaciatku kazdeho riadku, jednoduchsie sa tak pocitaju riadky.

.  -  RO - retiazkove ocko
I  -  KS  -  kratky stlpik
V  - pridaj  -  z jedneho KS urob dva KS
A  - odober  -  z dvoch urob jeden = zhackuj 2 ST do jedneho KS
st  -  stlpik 
R  -  riadok
o  -  magicky kruh  /  alebo  /  2 RO, do 2.RO uhackuj 6 KS


MALA BABIKA – uhackovana z tenkej priadze
VELKA BABIKA – uhackovana z vlny

HLAVA 
R1 - (6st) = 6 KS do magickeho kruhu     (ALEBO - 2  RO, do 2.RO uhackuj 6 KS)
R2 - (12st) = 2 KS do kazdeho ST dookolo
R3 - (18st) = (* uhac 1 KS, do dalseho ST uhac 2 KS *) opakuj 6 x
R4 - (24st) = (* uhac 2 KS, do dalseho ST uhac 2 KS *) opakuj 6 x
R5 - (30st) = (* uhac 3 KS, do dalseho ST uhac 2 KS *) opakuj 6 x
R6 – R13 = uhackuj KS dookola (30st)
R14 - (24st) = (* uhac 3 KS, zhackuj 2 ST do jedneho KS *) opakuj 6 x
R15 - (18st) = (* uhac 2 KS, zhackuj 2 ST do jedneho KS *) opakuj 6 x
R16 - (12st) = (* uhac 1 KS, zhackuj 2 ST do jedneho KS *) opakuj 6 x
R17 - (6st) = (* zhackuj 2 ST do jedneho KS *) opakuj 6 x

ked ukoncite R15:
*   Nasadte bezpecnostne oci, alebo nasite oci medzi riadkami 11 a 12 (nechajte 6 volnych stlpikov medzi ocami)
*   Vysite usmev (na riadku 14)
*   Zacnite vypchavat & tvarovat hlavu
ked ukoncite R17: 
*  odstrihnite priadzu, nechajte kratky koniec, zacistite koniec.

hlava VELKEJ BABIKY z vlny :
R17 - (8st) = (* uhac 1 KS, zhackuj 2 ST do jedneho KS *) opakuj 4 x
R18 - (8st) = uhackuj KS dookola

RUKA cela (urob 2)
R1 - (6st) = 6 KS do magickeho kruhu     (ALEBO - 2  RO, do 2.RO uhackuj 6 KS) 
R2 – R10 = (6st) = uhackuj KS dookola

*   odstrihnite priadzu, nechajte dlhy koniec priadze na nasitie ruk k telu

NOHA (urob 2)
R1 - (6st) = 6 KS do magickeho kruhu     (ALEBO - 2  RO, do 2.RO uhackuj 6 KS) 
R2 - (6st) uhackuj KS dookola
R3 - (6st) uhackuj KS dookola
R4 - (7st) 2 KS do prveho ST, 5 KS
R5 - (7st) uhackuj KS dookola
R6 - (7st) uhackuj KS dookola
R7 - (8st) 2 KS do prveho ST, 6 KS
R8 - (8st) uhackuj KS dookola
R9 - (8st) uhackuj KS dookola
R10 - (9st) 2 KS do prveho ST, 7 KS
R11 - (9st) uhackuj KS dookola
R12 - (9st) uhackuj KS dookola

* uhackujte prvu nohu – vypchajte nohu - odstrihnite priadzu, nechajte kratky koniec
* uhackujte druhu nohu – vypchajte nohu - ked bude noha dohackovana, neodstrihnite priadzu, pokracujte s TELOM

ZACIATOK TELA :
* v ruke drzime druhu nohu (neodstrihli sme priadzu, takze pokracujeme telom). Posledny riadok nohy dame dokopy, zatvorime takto otvor nohy navrchu (predtym musime vypchat nohu) - zhackujeme otvor nohy 4 stlpikmi a nohu sme tymto sposobom uzavreli.
* vezmeme prvu nohu, posledny riadok dame dokopy – zhackujeme otvor nohy 4 stlpikmi a nohu sme tymto sposobom uzavreli.
Nohy su TERAZ spolu v jednom riadku, to je: 4 ST na kazdej nohe, spolu je to 8 stlpikov v jednom riadku, aby sa tak vytvoril spodok tela
* nohy sa budu moct zohnut, takze babika moze lepsie sediet
* nohy takto nemusime prisivat k telu

TELOPOZNAMKA : (zvycajne hackujeme cez dve priadze predchadzajuceho riadku)
R1 - uhackujte 8 KS do zadnej priadze kazdeho ST – (8 KS na zadnej casti tela) /// otocte telo a ///
        uhackujte 8 KS do prednej priadze kazdeho ST - (8 KS na prednej casti tela), spolu 16 ST
        riadok neukonci, neuzavri, znova pracujete dokola – pouzite vlnu na oznacenie zaciatku riadka
R2 - (16st) uhackuj KS dookola
R3 - (16st) uhackuj KS dookola
R4 - (16st) uhackuj KS dookola
R5 - (16st) uhackuj KS dookola
R6 - (16st) uhackuj KS dookola
R7 - (16st) uhackuj KS dookola
R8 - (16st) uhackuj KS dookola
R9 - (14st) (* zhackuj 2 ST do jedneho KS, uhac 6 KS *) opakuj 2 x
R10 - (10st) (* zhackuj 2 ST do jedneho KS, 2 KS, zhackuj 2 ST do jedneho KS, 1 KS *) opakuj 2 x
R11 - (8st) (*zhackuj 2 ST do jedneho KS, uhac 3 KS *) opakuj 2 x

R12 - ked pouzijete vlnu na VELKU BABIKU - (8st) KS dookola

*   odstrihnite priadzu, nechajte dlhy koniec na nasitie tela k hlave.

******************************************************************************

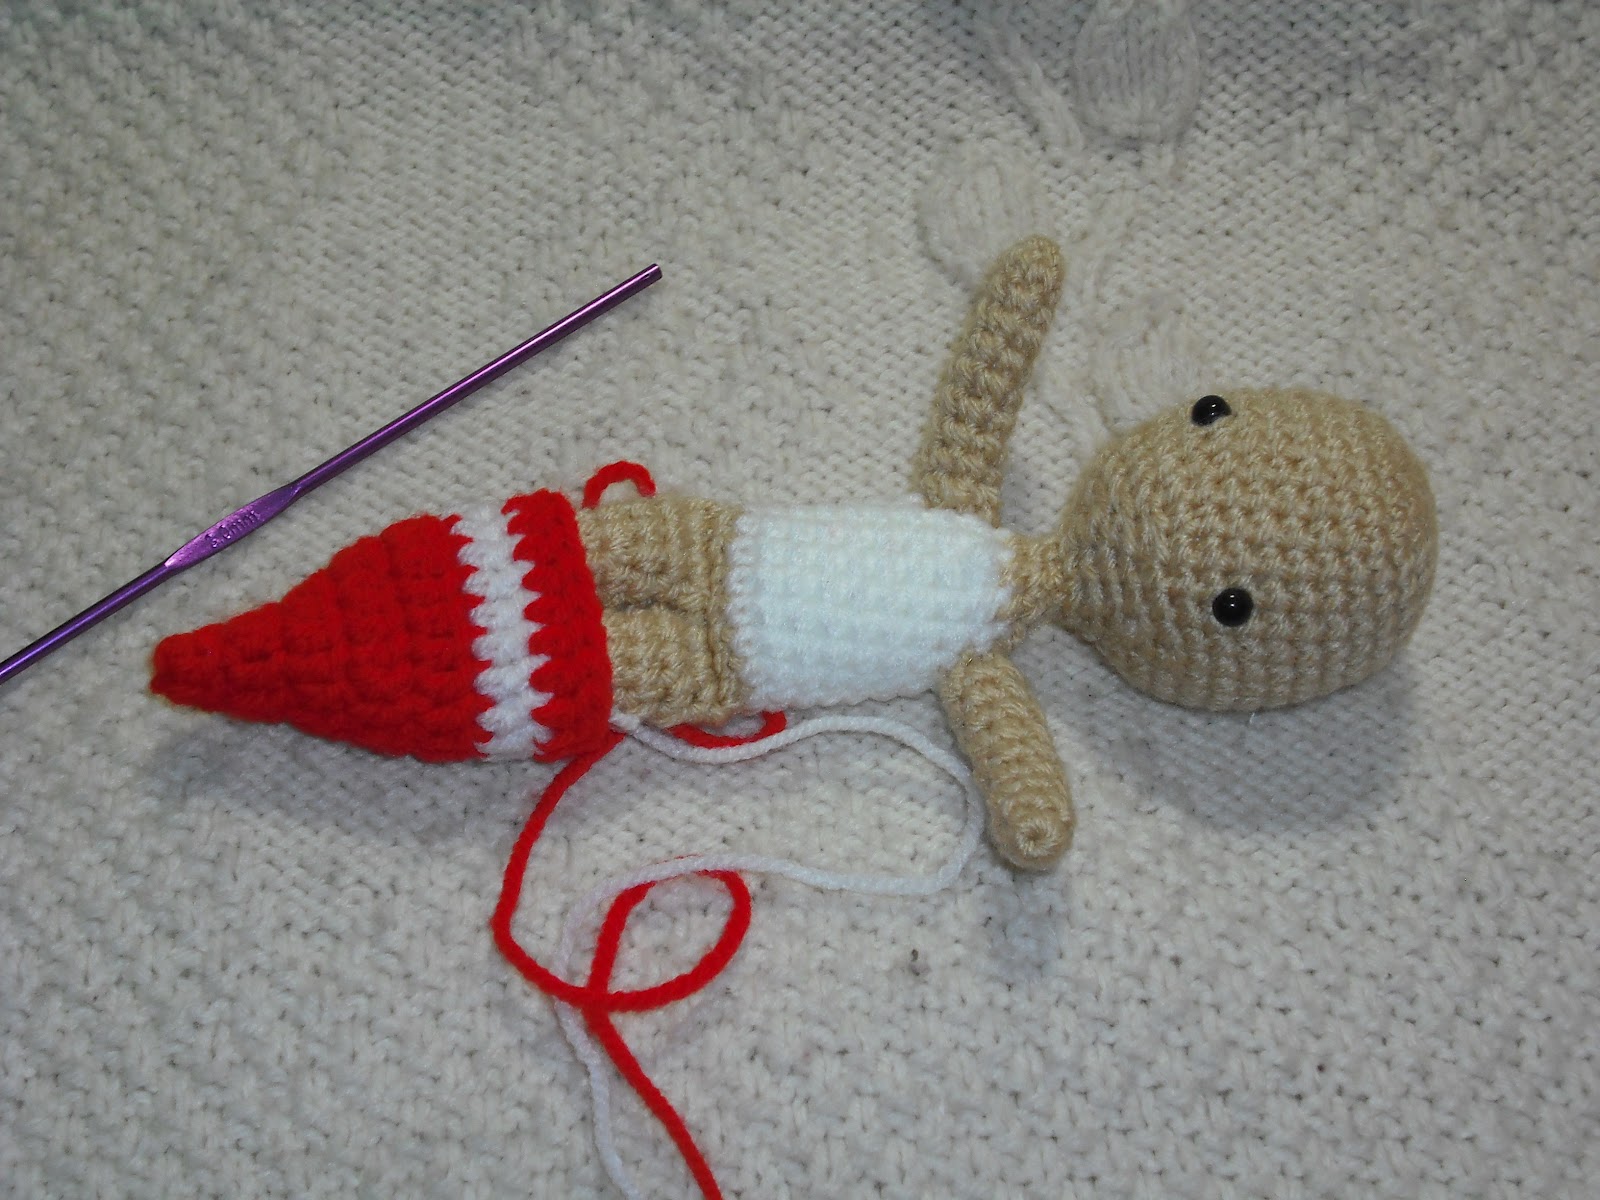
Dolny obrazok - babiky urobene z tenkej hackovacej priadze.


Raz som nemala dostatok telovej farby - tak som pouzila BIELU farbu - telo R2 - R10 (vid babiku na dolnom obrazku - urobena z vlny).

Pozrite si viac fotiek na poslednej strane.

Nasite telo k hlave.
Nasite ruky k telu.
Vlasy.

---------------------------------------------------------------------------------------------------

POUZITIE  OBRAZKOVEHO  POSTUPU :

HLAVA
magicky kruh    
R1 - I              (6sts)   =   ( alebo: 2  RO, do 2.RO uhackuj 6 KS )
R2 - A             opakuj 6 x (12st)
R3 - I A           opakuj 6 x (18st)
R4 - I I A         opakuj 6 x (24st)
R5 - I I I A       opakuj 6 x (30st)
R6 - I I I I I      opakuj 6 x (30st)
R7 – R12 =      (30st)
R13 - I I I I I    opakuj 6 x (30st)
R14 - I I I V     opakuj 6 x (24st)
R15 - I I V       opakuj 6 x (18st)
R16 - I V         opakuj 6 x (12st)
R17 - V           opakuj 6 x (6st)

hlava VELKEJ BABIKY z vlny :
R16 - I V        opakuj 6 x (12st)
R17 - I V        opakuj 4 x (8st)
R18 - I            (8st)

RUKA CELA :
magicky kruh    
R1 -              I              (6st)   =   ( alebo: 2  RO, do 2.RO uhackuj 6 KS )
R2 – R10 =   I              (6st)

NOHA :
magicky kruh    
R1  - I I I I I I              (6st)   =   ( alebo: 2  RO, do 2.RO uhackuj 6 KS )
R2  - I I I I I I              (6st)
R3  - I I I I I I              (6st)
R4  - A I I I I I             (7st)
R5  - I I I I I I I            (7st)
R6  - I I I I I I I            (7st)
R7  - A I I I I I I           (8st)
R8  - I I I I I I I I          (8st)
R9  - I I I I I I I I          (8st)
R10 - A I I I I I I I       (9st)
R11 - I I I I I I I I I       (9sts)
R12 - I I I I I I I I I       (9sts)

TELO :
vid horne poznamky pri pisanej verzii postupu ;o)
R1 - uhackujte 8 KS do zadnej priadze kazdeho ST – (8 KS na zadnej casti tela) /// otocte telo a ///
        uhackujte 8 KS do prednej priadze kazdeho ST - (8 KS na prednej casti tela), spolu 16 ST
        riadok neukonci, neuzavri, znova pracujete dokola – pouzite vlnu na oznacenie zaciatku riadka
R2  -  I                    opakuj 16 x (16st)
R3  -  I                    opakuj 16 x (16st)
R4  -  I                    opakuj 16 x (16st) 
R5  -  I                    opakuj 16 x (16st) 
R6  -  I                    opakuj 16 x (16st)
R7  -  I                    opakuj 16 x (16st)
R8  -  I                    opakuj 16 x (16st)
R9 - V I I I I I I      opakuj 2 x (14st)
R10 -   V I I V I      opakuj 2 x (10st)
R11 -     V I I I        opakuj 2 x (8st)

R12 - I                     opakuj 8 x (8st)  =   (ked pouzivate vlnu na VELKE BABIKY)

---------------------------------------------------------------------------------------------------

Uhackovala som rozne male oblecenia.

Saty morskej vily sa daju vyzliect....


Ak ma niekto zaujem, moz
em napisat postupy na saty, sveter a nohavice tiez.....


 Ten isty postup, ale male babiky su z tenkej priadze na hackovanie.

 Ten isty postup, ale vacsie babiky su z vlny.


English patterns into Slovak - Anglicke postupy do slovenctiny


Anglictina :

UK - anglicka US - americka
ch - chain ch - chain
ss - slip stitch ss - slip stitch
dc - double crochet sc - single crochet
htr - half treble hdc - half double crochet
tr - treble dc - double crochet
dtr - double treble tr - treble
trtr - triple treble dtr - double treble crochet


UK Slovak 
ch - chain RO - retiazkove ocko
ss - slip stitch  
dc - double crochet KS - kratky stlpik
htr - half treble  
tr - treble DS - dlhy stlpik
dtr - double treble  
trtr - triple treble  


English Slovak
head hlava
body telo
leg / legs (make 2) noha / nohy (urob 2)
arm / arms ruka / ruky (cela)
tail chvost
hook hacik
dress saty
hair vlasy
safety eyes bezpecnostne oci
eye / eyes oko / oci 
ear / ears ucho / usi
bunny zajac
bear medved
doll babika

Dalsi preklad z anglictiny do slovenctiny:


English Slovak
st (s) - stitch (es) ST - stlpik (steh)
sk - skip  skoc - preskoc
sk 1 st skoc 1 ST
inc - increase pridaj ( z jedneho KS urob dva KS )
dec - decrease odober (z dvoch urob jeden = zhackuj 2 KS )
2 dc in next st 2 KS do dalsieho ST
dec 1 zhackuj 2 ST do 1 KS
rep - repeat    op - opakuj
rep 6 times op 6x - opakuj 6 krat
work in continuous rounds (joined rounds) hackujeme dokola (spojene riadky)
work in closed rounds hackujeme riadky, ktore su ukoncene


Dalsi preklad z anglictiny do slovenctiny:

 
English Slovak
stuff vypchat 
begin stuffing zacni vypchavat 
continue stuffing firmly pokracuj s vypchavanim - na pevno
fasten OFF odstrihni priadzu
weave in end zacisti koniec priadze
leave long end / tail for sewing nechaj dlhy koniec priadze na prisivanie
sew body to head nasi telo na hlavu
ARM - attach to side of body RUKA - pripoj na bok tela
LEG - attach to bottom of body NOHA - pripoj na spodok tela
sew open end together zosi otvor dokopy (koniec)
attach ears pripoj usi


Dalsi preklad z anglictiny do slovenctiny:


VYSVETLIVKA tri rozne vety, znamena to iste:
6 dc in 2nd ch from hook - 6 KS do 2.RO od hacika
  -  do 2.RO uhac 6 KS
  - do druheho retiazkoveho ocka
  uhackujeme 6 kratkych stlpikov


Dalsi preklad z anglictiny do slovenctiny:


Skupina, ktoru opakujem viac krat po sebe:
(*   *) repeat group of sts (*  *) opakuj skupinu stlpikov


Dalsi preklad z anglictiny do slovenctiny:


Na konci riadku:
(6 sts) (6 st )  = (6stlpikov) 


Dalsi preklad z anglictiny do slovenctiny:


HEAD - START HLAVA - ZACIATOK / START
R1: ch 2, 6 dc in 2nd ch from hook 2 RO, do 2.RO uhac 6 KS
  (6 sts) (6 ST)
R2: dc 2 in each st around 2 KS do kazdeho ST okolo
  (12 sts) (12 ST)
R3: (* dc 1, 2 dc in next st *) (* uhac 1 KS, do dalsieho ST uhac 2 KS *)
  rep 6 times (18 sts) opakuj 6x    (18 ST)
R4: (* dc 2, 2 dc in next st *) (* uhac 2 KS, do dalsieho ST uhac 2 KS *)
  rep 6 times (24 sts) opakuj 6x    (24 ST)
R5: (* dc 3, 2 dc in next st *) (* uhac 3 KS, do dalsieho ST uhac 2 KS *)
  rep 6 times (30 sts) opakuj 6x    (30 ST)
R6: (* dc 4, 2 dc in next st *) (* uhac 4 KS, do dalsieho ST uhac 2 KS *)
  rep 6 times (36 sts) opakuj 6x    (36 ST)
R7: (* dc 5, 2 dc in next st *) (* uhac 5 KS, do dalsieho ST uhac 2 KS *)
  rep 6 times (42 sts) opakuj 6x    (42 ST)
R8: sc 42 uhac 42 KS                                 (42 ST)
R9-12 - " - - " -
R13: (* DC 5, dec 1 *)   (* uhac 5 KS, zhackuj 2 KS dokopy  *)
  rep 6 times (36 sts) opakuj 6x    (36 ST)
R14: (* DC 4, dec 1 *)   (* uhac 4 KS, zhackuj 2 KS dokopy  *)
  rep 6 times (30 sts) opakuj 6x    (30 ST)
R15: (* DC 3, dec 1 *)   (* uhac 3 KS, zhackuj 2 KS dokopy  *)
  rep 6 times (24 sts) opakuj 6x    (24 ST)

Place safety eyes.  Nasad oci / nasi oci

Embroidery nose (if needed) Vysi nos (ak treba)

Begin stuffing head. Zacni vypchavat 
R16: (* DC 2, dec 1 *)   (* uhac 2 KS, zhackuj 2 KS dokopy  *)
  rep 6 times (18 sts) opakuj 6x    (18 ST)
R17: (* DC 1, dec 1 *)   (* uhac 1 KS, zhackuj 2 KS dokopy  *)
  rep 6 times (12 sts) opakuj 6x    (12 ST)

continue stuffing head firmly pokracuj s vypchavanim hlavy na pevno
R18: (* sk 1 ST, dc 1 *) (* skoc 1 ST, 1 KS *)
  rep 6 times (6 sts) opakuj 6x    (6 ST)

fasten OFF odstrihni priadzu

weave in end zacisti koniec priadze


Preklad z anglictiny do slovenctiny:
PATTERN of  MERMAID, only DRESS, not doll

CROCHET SYMBOLS:


UK US
ch - chain ch - chain
ss - slip stitch ss - slip stitch
dc - double crochet sc - single crochet
htr - half treble hdc - half double crochet
tr - treble dc - double crochet
dtr - double treble tr - treble


Mermaid dress - start crochet from the bottom (where the feet will be hidden) - slip doll inside – doll with legs will change into mermaid !!!

WORK in closed rounds – NOT continuous rounds as doll – (NOT joined rounds)
  
Start with colour PINK – rows 1 to 5:

R1 – 1 ch; 3 ch (count as 1 tr); make 1 tr (into 4th chain from the hook); 4 tr (into the same chain); slip stitch to close row [ 6tr ]

R2 – 3 ch (at the beginning of the row count as 1 tr); tr 2 in next st;
(* 1 tr, tr 2 in next st *) - repeat 2 times; slip stitch to close row, [ 9 tr ]

R3 – 3 ch (at the beginning of the row count as 1 tr); tr 2 in next st;
(* 1 tr, tr 2 in next st *) - repeat 3 times; 1 tr; slip stitch to close row, [ 13 tr ]

R4 – 3 ch (at the beginning of the row count as 1 tr); tr 2 in next st;
(* 1 tr, tr 2 in next st *) - repeat 5 times; 1 tr; slip stitch to close row, [ 19 tr ]

R5 – 3 ch (at the beginning of the row count as 1 tr); 18 tr; slip stitch to close row, [ 19 tr ]

R6 - colour WHITE – same as R5

R7colour PINK – same as R5

R8colour WHITE - 3 ch (at the beginning of the row count as 1 tr);
17 tr; tr 2 in next last st, slip stitch to close row, [ 20 tr ]

R9colour PINK - 3 ch (at the beginning of the row count as 1 tr);
19 tr; slip stitch to close row, [ 20 tr ]

R10colour WHITE - 3 ch (at the beginning of the row count as 1 tr);
19 tr; slip stitch to close row, [ 20 tr ]

R11colour PINK - 3 ch (at the beginning of the row count as 1 tr);
2 ch; (* leave 1 st empty from row before & 1 tr into next st, 2 ch *) - repeat 9 times;
slip stitch to close row, [ 10 tr ]

R12still PINK colour – 1ch; 2 tr (crochet under row before where 2 ch are);
(* /see row before - leave 1 tr st empty/, 2 tr {crochet under row before where 2 ch are} *) - repeat 8 times, slip stitch to close row, [ 20 tr]

Fasten off and weave in end.

(This part is very hard to explain, so I will post picture pattern under this very soon):
CHEST COVER + 2 shoulder straps (in one row 13):
~ see the last row of dress (red row number 12) - leave 9 tr from beginning of row (from back of the dress) - attach WHITE colour.
~ 6 dc, ch 1, turn, 6 dc (on top of the last 6 dc) = chest cover (continue with shoulder strap)
~ 8 ch (first shoulder strap) - slip stitch onto 4th tr from beginning of row (continue with back)
~ 6 dc (on back of the dress), 8 ch (second shoulder strap), slip stich to front of chest cover
~ NOTE: under each arm is left space of 4 tr (of red colour)

MAKE 2 FINS colour PINK
R 1 - ch 3; tr 11 into 3rd chain from the hook; slip stitch to close row (including chains - 12 tr)
R 2 - ch 2; (* tr, 2 tr into next st *) rep 4 times; into last tr make 3 tr; slip stitch to close row (18 st)
R 3
- ch 1; into next treble make - 1tr, 1 dtr, 1 tr / into next tr - slit stitch

dtr = double treble
Fasten off and weave in ends.
Attach FINS onto end of tail.


Finished 3rd row


 Finishing row number 4


Finished 4th row

 Finishing row number 5

 Finishing row number 7

Finished 7th row

Made 2 FINS


Attached 2 FINS

 2 sizes of dolls & mermaid dresses


*****************************************************************************

I used ''PATONS FAB DK'' – on wool dolls


** You may keep a copy for your own personal use, but you may not sell or distribute it. **

** You can sell items made from this pattern, please provide a link to this pattern.**

** Please, do not claim this pattern as your own. This pattern is FREE for everyone !!! **

** If you wish to share this pattern, you may link to this pattern, but please do not reprint it on your site.**